Battery switch on travel trailer function is crucial for managing your RV’s power. This guide dives into how these switches work, troubleshooting common problems, and ensuring safe operation. We’ll cover different switch types, installation, maintenance, and safety precautions, making sure you’re comfortable handling your travel trailer’s electrical system.
Understanding your battery switch is key to preventing electrical issues and maximizing your RV’s power. From selecting the right switch for your setup to performing basic maintenance, we’ll equip you with the knowledge to keep your travel trailer running smoothly. We’ll explore everything from basic functionality to advanced troubleshooting, ensuring you’re ready for any situation on the road.
Understanding Battery Switch Functionality in Travel Trailers: Battery Switch On Travel Trailer Function
A battery switch is a crucial component in a travel trailer’s electrical system, allowing you to manage power sources effectively and protect your batteries. Understanding how it works is key to preventing electrical issues and maximizing your off-grid capabilities. This section will break down the functionality of battery switches, the different types available, and how to use them safely.
Types of Battery Switches
Travel trailers typically utilize one of two main types of battery switches: a simple on/off switch or a more sophisticated multi-position switch. The simple on/off switch simply connects or disconnects the battery from the trailer’s electrical system. The multi-position switch, often referred to as a battery selector switch, allows you to choose between different power sources, such as your house batteries, shore power, or a generator.
These switches offer greater control and flexibility. Some higher-end systems might even incorporate automatic switching based on power availability.
Purpose of Battery Switches in Power Management
The primary purpose of a battery switch is to control the flow of power from your various sources – shore power (hooked up to campground electricity), your generator, and your house batteries – to the trailer’s electrical system. This prevents accidental draining of your batteries when shore power is available, allows you to selectively charge your batteries from different sources, and protects your appliances and electronics from power surges or short circuits.
It acts as a central control point, allowing you to isolate your batteries when not in use to prevent parasitic drain.
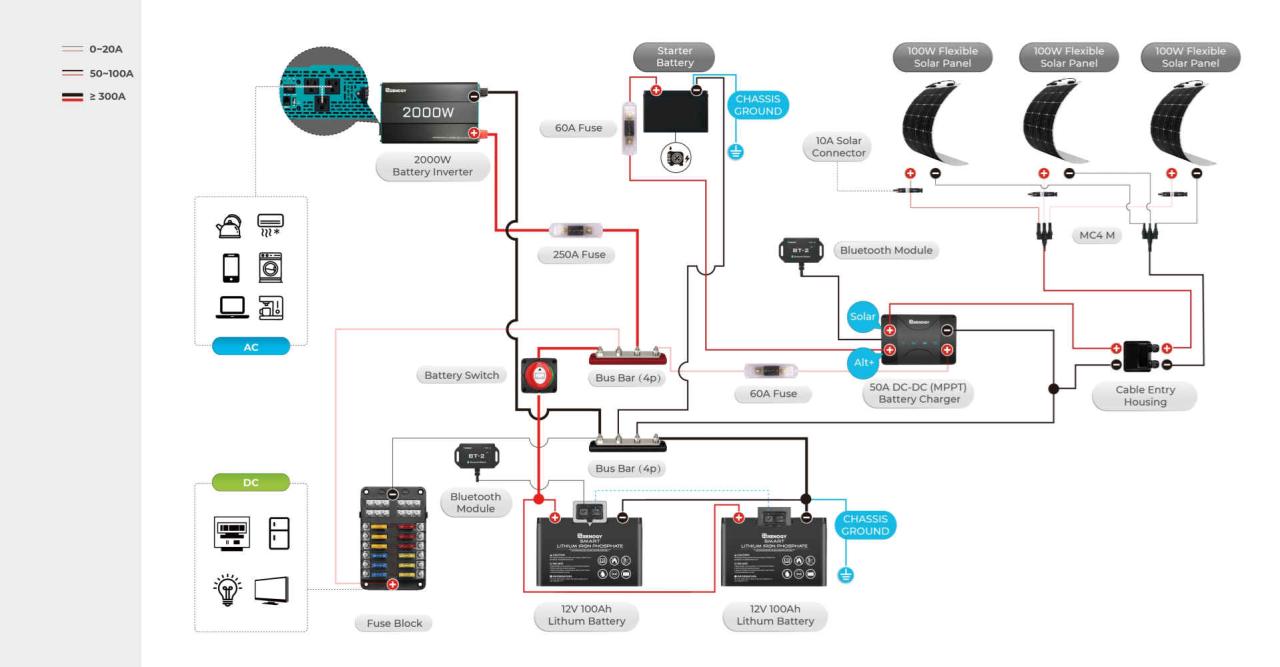
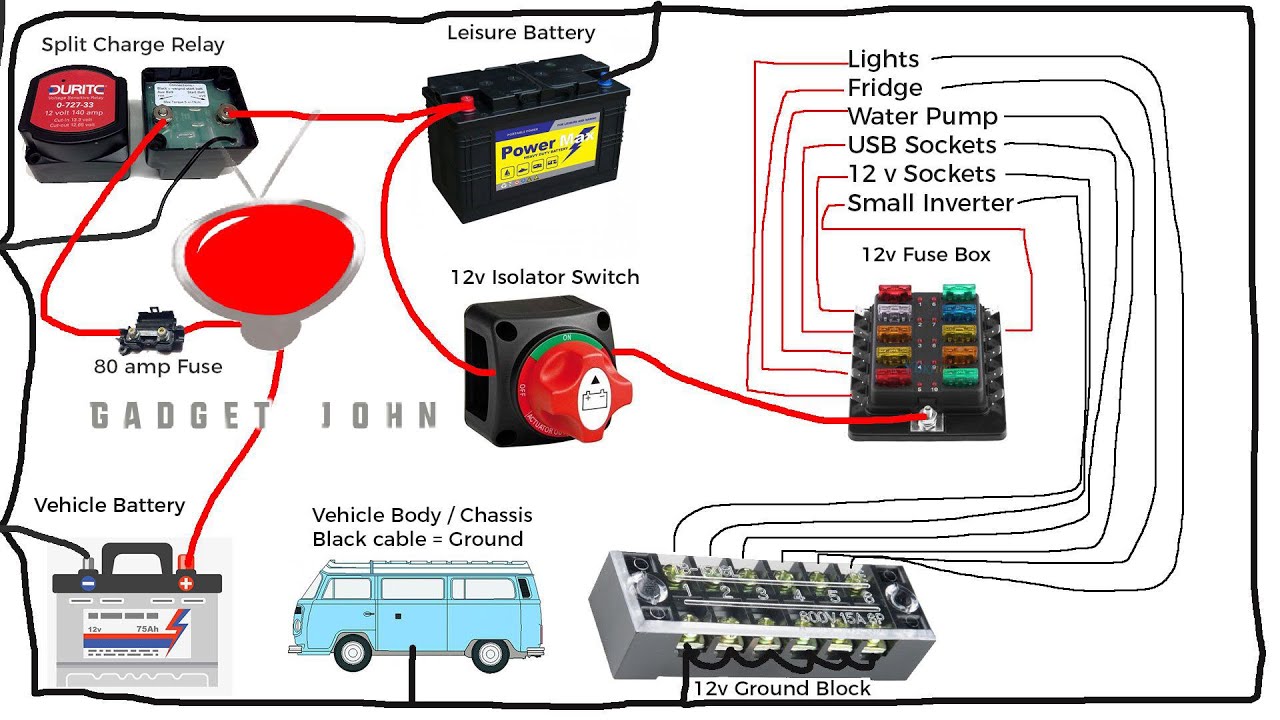
Typical Wiring Configurations
A typical wiring configuration involves the battery switch being positioned in the main power path between the batteries and the trailer’s 12-volt system. The switch is wired in such a way that it can either connect the batteries directly to the trailer’s system, connect shore power to the system bypassing the batteries, or connect the generator to the system bypassing the batteries.
This configuration is usually done with heavy-gauge wire to handle the current draw of the various appliances. A fuse or circuit breaker is often included for added safety. Detailed diagrams are usually available in your trailer’s electrical system documentation.
So, you’re planning a trip? Awesome! Don’t forget travel insurance! Seriously, it’s a lifesaver. Check out Aon travel insurance for comprehensive coverage. They’ve got options for every kind of adventure, from backpacking through Southeast Asia to a relaxing beach vacation. And if you’re looking for another reliable option, consider exploring Aon travel insurance as well; they often have competitive pricing and excellent customer service.
Getting insured is a small price to pay for peace of mind!
Using a Battery Switch: A Step-by-Step Guide
Before starting any work with your battery switch or electrical system, always disconnect the negative (-) terminal from your batteries. This crucial safety step prevents accidental shocks and short circuits.
- Identify your switch type: Determine if you have a simple on/off switch or a multi-position selector switch.
- Understand switch positions: If it’s a multi-position switch, familiarize yourself with each position (e.g., “Off,” “Battery,” “Shore Power,” “Both”).
- Connect to shore power or generator (if applicable): Plug into shore power or start your generator before switching to those positions.
- Select the desired power source: Move the switch to the appropriate position to select your power source (batteries, shore power, or generator).
- Monitor battery levels: Regularly check your battery voltage to ensure they are charging correctly.
- Turn off switch when not in use: When leaving your trailer for an extended period, turn the battery switch to the “Off” position to prevent parasitic drain.
Troubleshooting Common Battery Switch Issues
Your travel trailer’s battery switch is a crucial component, and problems with it can leave you stranded. Understanding common issues and how to troubleshoot them can save you time and frustration. This section covers identifying problems, diagnosing the switch itself, checking wiring, and using a multimeter for testing.
Identifying Common Battery Switch Problems, Battery switch on travel trailer function
Several symptoms point to problems with your battery switch or its related wiring. No power to the trailer’s systems is the most obvious sign. This could mean no lights, no water pump, or no operation of any 12V appliances. Flickering lights indicate a more intermittent problem, potentially a loose connection or a failing switch. A completely dead battery, even after charging, might suggest a problem with the switch preventing proper charging.
A persistent clicking sound from the switch might indicate a faulty internal mechanism.
Troubleshooting Steps for Diagnosing Battery Switch Problems
Before diving into complex testing, perform some basic checks. First, visually inspect the switch itself for any obvious damage, loose connections, or corrosion. Clean any corrosion you find with a wire brush and baking soda solution. Next, verify that the switch is correctly positioned to provide power to the trailer systems. Many switches have multiple positions: one for the trailer battery, one for the tow vehicle battery, and one for off.
If your switch is a multi-position type, try different positions. If the problem persists, you might need to proceed with more advanced diagnostics.
Troubleshooting Faulty Wiring Related to the Battery Switch
Faulty wiring is a frequent culprit. Trace the wiring from the switch to the battery and to the trailer’s distribution panel. Look for any broken, frayed, or corroded wires. Pay close attention to the connections at both ends of each wire. A loose connection can easily cause intermittent power or a complete loss of power.
Tighten any loose connections. If you find any damaged wires, they will need to be repaired or replaced. Use appropriately sized wire and crimp connectors for a secure connection.
Testing the Battery Switch with a Multimeter
A multimeter is an invaluable tool for diagnosing electrical problems. To test the switch, first ensure the switch is in the “off” position. Then, set your multimeter to measure DC voltage. Place one multimeter lead on one terminal of the switch and the other lead on the other terminal. The reading should be close to zero volts.
Next, turn the switch to the “on” position. You should now see a voltage reading that corresponds to the voltage of your battery (typically around 12 volts). If you get zero volts in the “on” position, the switch is likely faulty. If you see a voltage reading in the “off” position, there’s a problem with the switch’s internal mechanism.
Battery Switch Types and Their Features
Choosing the right battery switch for your travel trailer is crucial for managing your power effectively and preventing potential issues. Different types of switches cater to various needs and budgets, so understanding their features and limitations is key to making an informed decision. This section will explore the common types of battery switches available and compare their functionalities.
So, you’re planning a trip? Awesome! Don’t forget travel insurance! Check out Aon travel insurance for comprehensive coverage. They’ve got you covered for medical emergencies and trip disruptions. If you’re looking for a different provider with similar options, Aon travel insurance also offers solid plans, so compare and choose what best suits your needs and budget before you jet off! Remember, peace of mind is priceless.
Travel trailers utilize battery switches to control the flow of power from your house batteries to various onboard systems. The type of switch you choose depends largely on the number of batteries you have and the level of control you desire.
Single-Battery Switches
These switches are the simplest type, designed for travel trailers with only one house battery. They essentially act as an on/off switch, connecting or disconnecting the battery from the trailer’s electrical system. They’re inexpensive and easy to install, making them a good choice for basic setups. However, they offer minimal control and aren’t suitable for trailers with multiple batteries or complex electrical systems.
Dual-Battery Switches
Dual-battery switches are designed for trailers with two house batteries. These switches typically allow you to select between using one battery, both batteries in parallel (combined power), or disconnecting both batteries completely. This offers more flexibility in managing power consumption and extending battery life. They are a popular choice for many travel trailers, offering a good balance between functionality and cost.
Selector Switches
Selector switches provide the most control and flexibility. They can handle multiple batteries (often two or more) and allow for more complex configurations. You can typically select individual batteries, combine them in parallel, or completely isolate them. Some advanced selector switches may even include features like automatic charging prioritization or battery monitoring capabilities. They are the most expensive option but offer superior control and power management for those who need it.
Comparison of Battery Switch Types
The following table summarizes the key features of the different battery switch types. Note that specific features and pricing can vary depending on the manufacturer and model.
| Feature | Single-Battery Switch | Dual-Battery Switch | Selector Switch |
|---|---|---|---|
| Number of Batteries Supported | 1 | 2 | 2 or more |
| Switching Mechanism | Simple on/off | Rotary selector (typically 3 positions: off, battery 1, both batteries) | Rotary selector or multiple switches (various configurations possible) |
| Cost | Low | Medium | High |
| Complexity | Low | Medium | High |
| Flexibility | Low | Medium | High |
Battery Switch Installation and Upgrades
Installing or upgrading your travel trailer’s battery switch is a worthwhile project that can improve your RV’s electrical system reliability and functionality. This process requires some basic electrical knowledge and careful attention to safety. Always disconnect the battery’s negative terminal before beginning any work.
This section details the process of installing a new battery switch and upgrading to a more advanced system, emphasizing safe practices and proper component selection.
Installing a New Battery Switch
Installing a new battery switch involves several steps. First, you’ll need to identify the location for the new switch. Ideally, this should be easily accessible, yet protected from the elements. Next, disconnect the negative battery terminal. Then, carefully trace the existing wiring from the battery to the load center or other electrical components.
This will help you determine the appropriate wire gauge and understand the current flow. The new switch should be mounted securely using appropriate hardware. Connect the positive (+) cable from the battery to the input terminal of the switch. Then, connect the output terminal of the switch to the load center or other electrical components. Finally, reconnect the negative (-) terminal.
Remember to always double-check all connections before powering the system.
Imagine this: You have your new battery switch in hand, a robust model rated for the amperage of your trailer’s electrical system. The old switch is visibly corroded. You carefully remove the old switch, noting the wire connections. You mount the new switch on a nearby wall inside your RV, securing it with screws. You then meticulously reconnect the positive cable from the battery to the switch’s input, ensuring a snug and clean connection.
Following the wiring diagram, you connect the output to the load center, double-checking the polarity. You then reconnect the negative battery cable, and test the system thoroughly.
Upgrading to a More Advanced Battery Switch System
Upgrading to a more advanced system, such as one with multiple banks or remote control, offers greater control and flexibility. These systems typically incorporate features like automatic charging control, improved safety mechanisms, and clearer visual indicators. The installation process is similar to a basic switch installation but may require additional wiring and potentially a different mounting location.
For instance, upgrading to a system with a remote switch allows you to control your battery from inside the trailer, avoiding the need to go outside in inclement weather. A multi-bank system allows for managing multiple batteries simultaneously, often incorporating features like a disconnect for each bank.
Wire Sizing and Fuse Selection
Proper wire sizing and fuse selection are critical for safety and system performance. The wire gauge should be appropriate for the amperage of the system. Undersized wire can overheat and create a fire hazard. Fuses should be sized to protect the wiring and components from overcurrent situations. Consult an electrician or use online wire gauge calculators to determine the correct sizing.
For example, if your system draws 100 amps, you would need a wire gauge capable of handling that current without excessive heat buildup. A fuse rated slightly higher than the maximum amperage of the system (e.g., 125 amps for a 100-amp system) would protect the system from overloads. This should be checked against the manufacturer’s specifications for the battery switch and the entire system.
Choosing the Appropriate Battery Switch
The choice of battery switch depends on the travel trailer’s electrical system. Consider the number of batteries, amperage draw, and desired features. A simple on/off switch might suffice for a small trailer, while a more complex system is needed for larger trailers with multiple batteries and appliances. Always choose a switch with an amperage rating that exceeds the maximum current draw of your system.
For instance, a small travel trailer with a single battery and minimal appliances might only require a 75-amp switch. However, a larger trailer with multiple batteries and a substantial number of appliances might require a 200-amp or even higher-rated switch to handle the increased current demand.
Mastering your travel trailer’s battery switch is a significant step towards confident RV ownership. By understanding its function, troubleshooting potential problems, and prioritizing safety, you’ll ensure a reliable power supply for all your adventures. Regular maintenance and knowing when to seek professional help are vital for a smooth and enjoyable RV experience. Happy travels!
Detailed FAQs
How often should I inspect my battery switch?
Inspect your battery switch at least once a month, or more frequently if you’re using your RV often.
What does it mean if my battery switch is hot to the touch?
A hot battery switch indicates excessive current draw or a faulty connection. Turn off the switch immediately and investigate the problem.
Can I use any type of lubricant on my battery switch?
No, use only dielectric grease on electrical connections to prevent corrosion without harming the components.
What size fuses should I use with my battery switch?
The appropriate fuse size depends on your system’s amperage. Consult your RV’s wiring diagram or a qualified electrician.
